This page may contain affiliate links, including products featured through creator collaborations. As an Amazon Associate and affiliate partner, Routine, Revised may earn from qualifying purchases.
How to Use a Stud Finder
When hanging shelves, televisions, mirrors, or heavier wall décor, finding a wall stud is one of the safest ways to make sure the item stays securely mounted.
A stud is the vertical support inside a wall that runs from floor to ceiling. In most homes these supports are wood, although metal studs are sometimes used depending on the construction.
Attaching screws directly into a stud provides much stronger support than drywall alone.
A stud finder is a small handheld tool that helps locate these supports behind the wall. Using one only takes a few moments and can make hanging items much easier.
What a Stud Finder Detects
Stud finders work by detecting changes in density behind the drywall. As the device moves across the wall, it senses when it passes over a stud and signals the location with a light, sound, or both.
In many homes, studs are spaced about 16 inches apart from center to center, although in some construction the spacing may be closer to 24 inches.
Because of this spacing, when scanning a wall you are usually searching within about a two-foot span to locate the nearest stud.
Basic Stud Finder
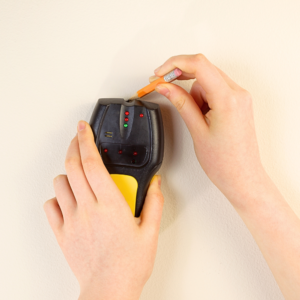
Stud Finder
A stud finder helps locate the structural supports behind drywall so shelves and wall mounts can be installed securely.
Why it works:
 Helps anchor screws into solid framing instead of drywall.
How to Use a Stud Finder
Using a stud finder is straightforward once you know the basic steps.
1. Place the stud finder flat against the wall
Hold the device flat against the wall surface, a short distance to the side of where you plan to mount the item.
Keeping the tool flat helps the sensors read the wall correctly.
2. Turn the device on and allow it to calibrate
Most stud finders should be turned on while touching the wall so the tool can calibrate itself to the surface.
Once the light stops flashing or the tool stops beeping, it is ready to use. Since models vary slightly, it’s always helpful to check the instructions for your specific tool.
3. Slowly slide the stud finder across the wall
Move the stud finder slowly in a horizontal direction, keeping the tool flat against the wall as you scan.
Moving too quickly can cause the device to miss the stud.
4. Mark the edge of the stud
When the stud finder signals that it has detected a stud — usually with a light or beep — mark that location lightly with a pencil.
Move the tool back and forth across that area to confirm the spot that triggers the alert. This mark usually indicates the edge of the stud.
5. Find the center of the stud
Continue sliding the stud finder until the signal stops, then begins again as you pass the other edge of the stud.
Mark that point as well.
The center of the stud is typically located halfway between those two marks, and this is the best place to install your screw or mounting hardware.
Confirm the Stud Location
Occasionally a stud finder may detect something inside the wall such as metal pipes, brackets, or wiring and give a false signal.
A simple way to double-check your location is to continue scanning the wall to find the next studs nearby. If they appear about 16 to 24 inches apart, you’ve likely identified the correct stud.
Lightly tapping the wall can also help:
• drywall tends to sound hollow
• studs usually sound more solid
If you suspect electrical wiring or plumbing behind the wall, it’s best to stop and consult a professional before drilling.
When You Should Use a Stud
Mounting directly into a stud is recommended for heavier items such as:
• wall shelves
• televisions
• large mirrors
• heavy picture frames
• cabinet brackets
For smaller wall décor, drywall anchors may sometimes be sufficient.
For tight spaces where drilling isn’t practical, adhesive shelf brackets can provide a simple solution.
Gigi Says
Most wall projects only take a few minutes — but fixing a loose mount later can take much longer.
Taking a moment to find the stud first is one of those small steps that helps the job stay simple and secure.
This article is for general informational purposes only. Always follow the instructions provided with your tools and consider consulting a professional if you are unsure about a project.